

Nest.js Authorisation with Firebase Auth
7th Oct 2022 • 15 min read — by Aleksandar Trpkovski
Play audio summary
What is Nest (NestJS)?
Nest is a progressive Node.js framework for building efficient, reliable and scalable server-side applications with TypeScript.
Under the hood, Nest makes use of two javascript backend frameworks Express (the default) and can also be configured to use with Fastify as well!
The examples in this blog article leverages on the default Express framework.
What is Firebase?
Firebase as a platform that offers a wide range of services to developers to build, improve, and grow their apps with little or almost no effort. This includes services like authentication, databases, analytics, file storage, push messaging and more. When it comes to user authentication, Firebase provides an Authentication service that allows for codes to be written in order for users to be logged into an app from the client side. Firebase also provides an Admin SDK that allows developers to integrate their applications with custom backend, if required.
In this blog article we will be creating a Nest application where users (with different roles) can sign-up and sign-in to the application. Specific permissions can be configured for each user access to specific endpoints, based on the user role. We are going to use Firebase Auth to help us with user Authentication and Authorisation.
Create a Nest Project
Before we continue let’s first install Nest CLI. That will enable us to efficiently create this project. To install Nest CLI globally, use the following command in your terminal:
npm install -g @nestjs/cli
Setting up a new project is quite simple with Nest CLI. We can create a new Nest project with the following commands in our terminal:
nest new nest-auth-with-firebase-auth
Next, choose npm for this project.
? Which package manager would you ❤️ to use?
  npm
❯ yarn
  pnpm
? Which package manager would you ❤️ to use? npm
▹▹▹▹▸ Installation in progress... ☕
Lastly, navigate to the newly created nest-auth-with-firebase-auth directory and run this project.
$ cd nest-auth-with-firebase-auth
$ npm run start
If we navigate to the http://localhost:3000 in the browser, we will be able to see Hello World!
Now, let’s have a look at the folder structure in our Nest project. Inside the nest-auth-with-firebase-auth directory we have node_modules, a few other boilerplate files and a src/ directory populated with several core files.
app.controller.spec.ts
app.controller.ts
app.module.ts
app.service.ts
main.ts
Cool, this means that we have successfully created our Nest project.
Getting started with Firebase Auth
Before we start working with Firebase, create a Firebase project in the Firebase console.
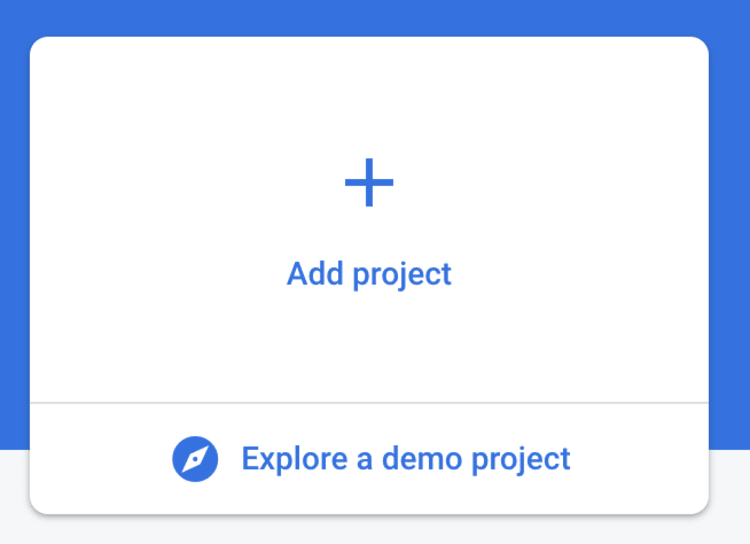
We can do so by clicking Add Project from the Firebase Console:
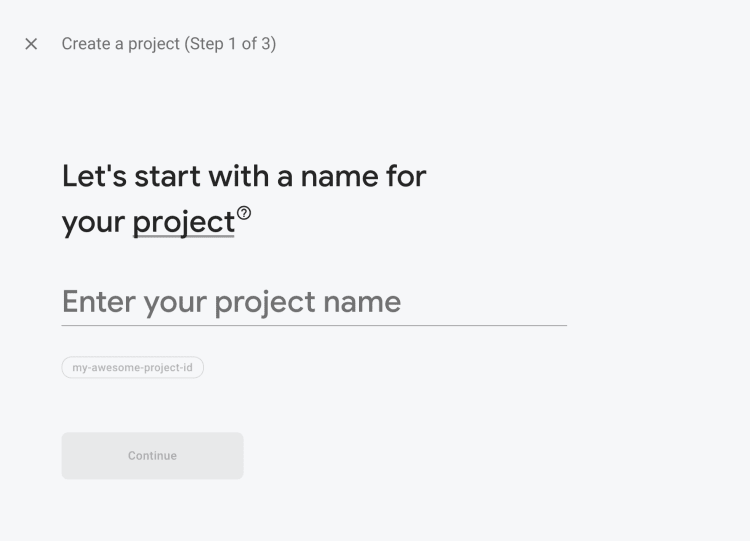
Enter the project name in the prompt and follow the next three steps to setup the project. In a short period of time, the project will be created.
That’s all we need for now. Later in the blog article, we will come back to setup some more things. Until then, let’s move to the next section where we start implementing our Authentication in Nest.
Create a user module
We are going to create a user module, user controller and user service. We can do that efficiently with Nest CLI.
First, we create the user module:
nest g module user
Nest CLI will automatically create user.module.ts file under the user directory and update the app.module.ts file accordingly.
Next, we create the controller:
nest g controller user --no-spec
You would have noticed that we use --no-spec flag at the end of the command. This allows us to exclude the user.controller.spec.ts file.
Lastly, we create the service file:
nest g service user --no-spec
Nest Configuration
Applications often run in different environments. Depending on the environment, different configuration settings should be used.
Nest provides a @nestjs/config package out-of-the box. In order to setup our configuration, we need to install it first.
npm i --save @nestjs/config
Once the installation process is complete, we import the ConfigModule. We need to import the module into the root app.module.ts file. Next, add the config module into the imports array. The code inside app.module.ts now will look like this:
import { Module } from "@nestjs/common";
import { AppController } from "./app.controller";
import { AppService } from "./app.service";
import { UserModule } from "./user/user.module";
import { ConfigModule } from "@nestjs/config";

@Module({
    imports: [
        ConfigModule.forRoot({
            isGlobal: true,
            envFilePath: ".env",
        }),
        UserModule,
    ],
    controllers: [AppController],
    providers: [AppService],
})
export class AppModule {}
Inside ConfigModule.forRoot we pass an object to further configure the ConfigModule. First, set the property isGlobal to be true. This will help us to use ConfigModule in other modules so we don’t need to import our module into each module we use. Secondly, set envFilePath to be .env. This will load and parse a .env so that we can access the environmental variable throughout the app using process.env.
Lastly, create a .env file at the root of this project.
We are now all set with the ConfigModule . Let’s move on to setting up Firebase Auth in our Nest app.
Firebase Setup
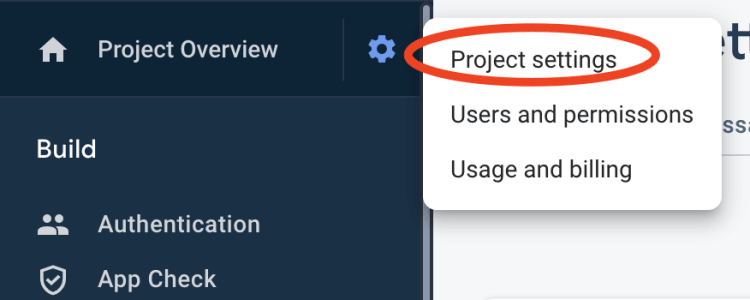
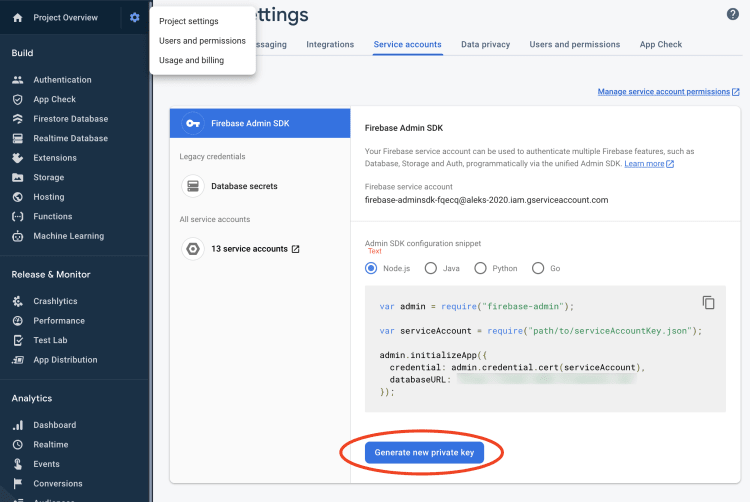
We will need to go back to our Firebase project console to generate a private key which allows us configure the Firebase Node.js Admin SDK. To generate the private key, navigate to Project Overview → Project Settings → Service Accounts → Generate new private key.
This will download a serviceAccountKey.json file.
Now, we have two choices:
- We can set all values from the
serviceAccountKey.jsonas environmental variables in our.envfile or - We can import
serviceAccountKey.jsondirectly in our app.
In this example, we are going to use the second option. Feel free to try the first one if that works better to you.
We will next create a config/ directory at the root of the Nest project. Inside the directory, copy this file serviceAccountKey.json and rename it to: firebaseServiceAccountKey.json.
To proceed with the Firebase Node.js Admin SDK first we need to install it:
yarn add firebase-admin
Next, create new file called firebase.setup.ts and place the following code:
import { Injectable, OnApplicationBootstrap } from "@nestjs/common";
import { readFile } from "fs/promises";
import * as admin from "firebase-admin";
let app: admin.app.App = null;
@Injectable()
export class FirebaseAdmin implements OnApplicationBootstrap {
    async onApplicationBootstrap() {
        if (!app) {
            const firebaseServiceAccountFile = await readFile("./config/firebaseServiceAccountKey.json", "utf8");
            const serviceAccount = await JSON.parse(firebaseServiceAccountFile);
            app = admin.initializeApp({
                credential: admin.credential.cert(serviceAccount),
            });
        }
    }
    setup() {
        return app;
    }
}
In order to use these files across our Nest application, we will first need to import the files and then define them as providers in each of the modules. We will do that later as we progress with our application.
Define Auth Guards
The purpose of implementing an authentication and authorisation is to be able to protect certain parts of the application to only authenticated users with a specific permissions. This might sound complicated, but with Nest and Firebase this implementation is made straightforward.
Nest has Guards to handle all of this out of the box. Guards have a single responsibility. They determine whether a given request should be handled by the route handler or not, depending on certain conditions like permissions or roles. For more details on how Guards work inside Nest, please refer to this link.
Let’s define our Guard. Create a new directory inside the src/ called guards/. Within the directory, create a file auth.guard.ts where we will place the logic for our Firebase authentication Guard.
import { Injectable, CanActivate, ExecutionContext, UnauthorizedException } from "@nestjs/common";
import { Reflector } from "@nestjs/core";
import { FirebaseAdmin } from "../../config/firebase.setup";

@Injectable()
export class AuthGuard implements CanActivate {
    constructor(
        private reflector: Reflector,
        private readonly admin: FirebaseAdmin
    ) {}

    async canActivate(context: ExecutionContext): Promise<boolean> {
        const app = this.admin.setup();
        const idToken = context.getArgs()[0]?.headers?.authorization.split(" ")[1];

        const permissions = this.reflector.get<string[]>("permissions", context.getHandler());
        try {
            const claims = await app.auth().verifyIdToken(idToken);

            if (claims.role === permissions[0]) {
                return true;
            }
            throw new UnauthorizedException();
        } catch (error) {
            console.log("Error", error);
            throw new UnauthorizedException();
        }
    }
}
In order to use the Guard, we will first need to declare our custom decorator. Create a new directory inside the src/ called decorators/. Inside the directory, create a file auth.decorator.ts where we can declare our custom decorator.
import { applyDecorators, UseGuards, SetMetadata } from "@nestjs/common";
import { AuthGuard } from "../guards/auth.guard";

export function Auth(...permissions: string[]) {
    return applyDecorators(SetMetadata("permissions", permissions), UseGuards(AuthGuard));
}
And that’s it. I will demonstrate how we can use this custom decorator to protect our endpoints later in this article.
We will now implement the user creation using the Firebase Admin SDK.
User Creation with Firebase Admin SDK
Before we jump to the implementation on the user creation, a couple of things needs to be done beforehand. Firstly we need to enable the email and password authentication in the Firebase console in our project. Secondly, create the Data Transfer Object (DTO) file where will define the user properties that will be validated on incoming requests.
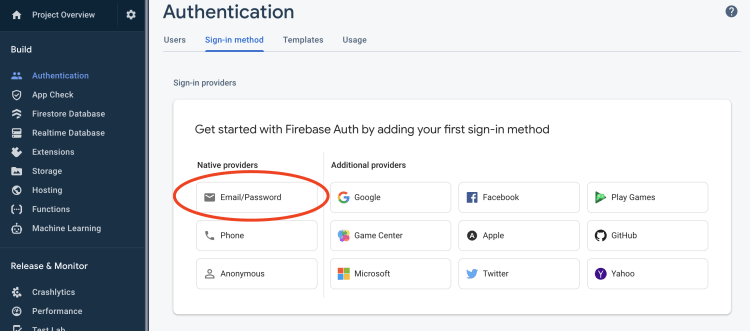
Enable Email/Password Authentication
To enable Email/Authentication, navigate to the Authentication module → Email/Password.
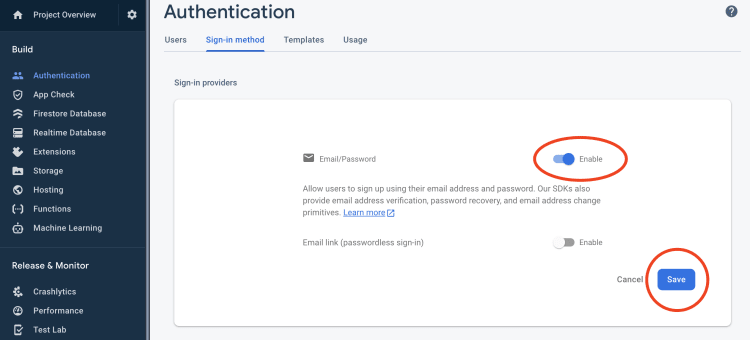
Next, enable Email/Password and save it.
We are now able sign up/sign in users using the Firebase Auth with email and password.
Create a DTO
We will now create a DTO inside our user module. Install two more libraries that will help us with the incoming request validation. We can do so by installing class-validator, and class-transformer with the following command:
npm install class-validator class-transformer --save
Next, create a new directory called dto/ inside src/user/. Inside dto/ create user.dto.ts file. The code in user.dto.ts file will look like this:
import { IsEmail, IsNotEmpty, MaxLength, MinLength, Matches, IsEnum, IsAlpha } from "class-validator";

enum Permissions {
    ADMIN = "ADMIN",
    USER = "USER",
    DEVELOPER = "DEVELOPER",
}

export class UserDto {
    @IsEmail()
    @IsNotEmpty()
    email: string;

    @IsNotEmpty()
    @MinLength(8)
    @MaxLength(20)
    @Matches(/^(?=.*\d)(?=.*[a-z])(?=.*[A-Z])(?=.*[!@#$%^&*]).{8,20}$/, {
        message: "password too weak",
    })
    password: string;

    @IsNotEmpty()
    @MinLength(2)
    @MaxLength(20)
    @IsAlpha()
    firstName: string;

    @IsNotEmpty()
    @MinLength(2)
    @MaxLength(20)
    @IsAlpha()
    lastName: string;

    @IsNotEmpty()
    @IsEnum(Permissions, { each: true })
    permissions: Permissions[];
}
We should expect five properties to be sent with the request: an email address, a strong password, users first and last name and user’s permissions (roles) which will accept three possible values, ADMIN, USER and DEVELOPER.
One more thing needs to be done to make the DTO work. We need to import and set the ValidationPipe in the main.ts file. Our main.ts file should look like this:
import { NestFactory } from "@nestjs/core";
import { AppModule } from "./app.module";
import { ValidationPipe } from "@nestjs/common";

async function bootstrap() {
    const app = await NestFactory.create(AppModule);
    app.useGlobalPipes(new ValidationPipe());
    await app.listen(3000);
}
bootstrap();
User Creation
Before jumping into the user creation implementation, thefirebase.setup.ts file needs to be imported and declared as a provider in our user’s module. So our user.module.ts file should appear as follows:
import { Module } from "@nestjs/common";
import { FirebaseAdmin } from "config/firebase.setup";
import { UserController } from "./user.controller";
import { UserService } from "./user.service";

@Module({
    controllers: [UserController],
    providers: [UserService, FirebaseAdmin],
})
export class UserModule {}
We can now use Firebase setup in the user’s service. Head over to the user’s service file and create a method called createUser inside the UserService class. The user.service.ts file should appear as follows:
import { Injectable, BadRequestException } from "@nestjs/common";
import { FirebaseAdmin } from "../../config/firebase.setup";
import { UserDto } from "./dto/user.dto";

@Injectable()
export class UserService {
    constructor(private readonly admin: FirebaseAdmin) {}

    async createUser(userRequest: UserDto): Promise<any> {
        const { email, password, firstName, lastName, role } = userRequest;
        const app = this.admin.setup();

        try {
            const createdUser = await app.auth().createUser({
                email,
                password,
                displayName: `${firstName} ${lastName}`,
            });
            await app.auth().setCustomUserClaims(createdUser.uid, { role });
            return createdUser;
        } catch (error) {
            throw new BadRequestException(error.message);
        }
    }
}
We can make a use of this module inside user’s controller where we will now declare our endpoint. Our user.controller.ts file should look like this:
import { Controller, Post, Body } from "@nestjs/common";
import { UserService } from "./user.service";
import { UserDto } from "./dto/user.dto";

@Controller("user")
export class UserController {
    constructor(private readonly userService: UserService) {}

    @Post("/signup")
    signup(@Body() userRequest: UserDto) {
        return this.userService.createUser(userRequest);
    }
}
And that’s it. We will next create our first user.
Sign up Users with different permissions
To test the creation of new users, we will need a tool that will help us with the API server requests. The most popular tool for this purpose is an application called Postman, it is free and easy to use. If you are a VSCode user, you can use an extension called REST Client. REST Client allows you to send HTTP request and view the response in Visual Studio Code directly. All endpoints that we are going to test here in this article will be included in the api.request.http file in the root of the project so you can test this with the REST Client extension.
To signup a new user, we will create the following request in our local server:
POST http://localhost:3000/user/signup HTTP/1.1
Content-Type: application/json

{
    "email": "admin@test.com",
    "password": "P@ssword1",
    "firstName": "Darrell",
    "lastName": "Werner",
    "role": "ADMIN"
}
With the above request, we have created a User with ADMIN role.
Let’s now proceed to create two more users, but with different roles: USER and DEVELOPER. If we try to create a user with permissions that we have’t defined in our DTO enum Permissions, we will get an error:
HTTP/1.1 400 Bad Request

{
  "statusCode": 400,
  "message": [
    "each value in permissions must be a valid enum value"
  ],
  "error": "Bad Request"
}
Create guarded endpoints
Finally, we will create endpoints by using the Guard that was created earlier. Declare the FirebaseAdmin as a provider in app.module.ts. Our app.module.ts will appear as follows:
import { Module } from "@nestjs/common";
import { AppController } from "./app.controller";
import { AppService } from "./app.service";
import { ConfigModule } from "@nestjs/config";
import { FirebaseAdmin } from "../config/firebase.setup";
import { UserModule } from "./user/user.module";

@Module({
    imports: [
        ConfigModule.forRoot({
            isGlobal: true,
            envFilePath: `.env`,
        }),
        UserModule,
    ],
    controllers: [AppController],
    providers: [AppService, FirebaseAdmin],
})
export class AppModule {}
Next, create three new endpoints:
/morningwhich will be accessed by users withADMINpermissions only,/afternoonaccessed byDEVELOPERusers, and/eveningthat will be accessible by everyone.
Our app.controller.ts file will look like this:
import { Controller, Get } from "@nestjs/common";
import { Auth } from "./decorators/auth.decorator";

@Controller()
export class AppController {
    @Get("/morning")
    @Auth("ADMIN")
    goodMorning() {
        return "Good Morning!";
    }

    @Get("/afternoon")
    @Auth("DEVELOPER")
    goodAfternoon() {
        return "Good Afternoon!";
    }

    @Get("/evening")
    goodEvening() {
        return "Good Evening!";
    }
}
To test our newly created endpoints, we need to have an access token and have that included in the Authorisation header with each request we make to the guarded endpoints.
In order to get the access token we will need to setup the Firebase client SDK. We will not go into the details of how to setup the client SDK at the moment. This will be a topic for a separate blog article. Firebase has great examples of that topic with all major frontend frameworks. You can find the documentation with examples in the following link.
Testing guarded endpoints
Let’s test out the protected endpoints with the access token obtained from the client app. We need to include the following in each request we make in the Authorisation header:
GET http://localhost:3000/morning HTTP/1.1
Content-Type: application/json
Authorization: Bearer {USER_ACCESS_TOKEN}

{}
If the access token is from the admin@test.com user created earlier, we will get a success 200 response:
HTTP/1.1 200 OK
Good Morning!
But if we try to access via the other two users we earlier created, we will get a 401 Unauthorised response:
HTTP/1.1 401 Unauthorized
{
  "statusCode": 401,
  "message": "Unauthorized"
}
And that’s all!
All examples above can be found in the following Github repository link.
Conclusion
- This blog article shows how to sign up and sign in users with specific roles. Then giving those users access to only specific endpoints based on their roles. To accomplish that, we used Firebase auth to help us with the users Authentication and Authorisation.
- To create and validate users in our app we used the Firebase Admin package for Node.js SDK link link.
- Nest has built in Guards mechanisms to handle the protected endpoints. The official documentation has great examples on how to use guards.
- To be able to get the access token, we will need to setup the Firebase client SDK. Firebase has great documentation and examples on that topic with all the major frontend frameworks. You can find these examples in the following link.
Further Reading
Explore more articles that might interest you.