
Single Sign On (SSO) with Firebase Authentication across multiple domains
2nd April 2023 • 11 min read — by Aleksandar Trpkovski
Play audio summary
Firebase is a great platform that offers a wide range of services to developers, making it easy to build, improve, and grow their apps. One of these services is Firebase Auth, which allows for easy user authentication using its JavaScript SDK.
Despite Firebase Auth being an awesome service and abstracting a lot of the complex code needed to build user authentication, I recently found one limitation: Firebase Auth doesn't persist the session across multiple domains. This means that if we use the same Firebase Auth for two different domains, such as https://example1.com and https://example2.com, we have to sign in to both applications on both domains independently. Currently, Firebase doesn't have a built-in feature to handle this situation out of the box.
In the following blog article, we will show a simple workaround to overcome this limitation using an <iframe>. We will demonstrate this example by creating three different applications: the first application will be called "authentication", where we will create the sign in logic to handle authentication. Then, we will embed the the "authentication" app using an iframe within our other two applications. We will use Vite and Tailwind CSS to help us create the apps more quickly. You don't need to be an expert in these two technologies, but some knowledge of JavaScript, TypeScript, and basic Firebase Auth is recommended in order to follow along. Without wasting too much time, let's get started!
Create Vite app
We are planning to create three projects. As mentioned in the introduction, the first project will only focus on authentication logic. The other two projects will include authentication through the iFrame.
To start, let's create our first application using Vite and set it up with TypeScript. The process of creating a Vite app will be the same for the other two applications.
yarn create vite
? Project name: › authentication
? Select a framework: › - Use arrow-keys. Return to submit.
❯   Vanilla
    Vue
    React
    Preact
    Lit
    Svelte
    Others
? Select a variant: › - Use arrow-keys. Return to submit.
JavaScript
❯   TypeScript
cd authentication
  yarn
  yarn dev
Next, we need to create vite.config.ts in the root directory of the project and set the port number for our authentication app to run on locally. We will set the port number to 3000 for this project. For the other two projects, we will set the ports to 3001 and 3002, respectively, so that each project has its own unique port number. Additionally, we need to install a plugin to enable https on https://localhost:3000.
yarn add @vitejs/plugin-basic-ssl
The vite.config.ts file should resemble the following:
import { defineConfig } from "vite";
import basicSsl from "@vitejs/plugin-basic-ssl";

export default defineConfig({
    server: {
        port: 3000,
        https: true,
    },
    plugins: [basicSsl()],
});
To begin building our app, let's first delete all unnecessary files in the project. Within the /src folder, we should only keep the main.ts file and remove all other logic within it.
Add Tailwind CSS
To help us style our application layout, we are going to add Tailwind CSS.
yarn add -D tailwindcss
npx tailwindcss init
We need to add the following tailwind.config.cjs inside.
module.exports = {
    content: ["./index.html", "./src/**/*.{html,ts}"],
    theme: {
        extend: {},
    },
    plugins: [],
};
Next, we need to create two CSS files: input.css and output.css, inside the /assets/tailwind directory.
Inside input.css, we are adding the following code:
@tailwind base;
@tailwind components;
@tailwind utilities;
In output.css, we are leaving it empty.
We need to add the following code snippet inside the header section of index.html.
<link href="./assets/tailwind/output.css" rel="stylesheet" />
Next, run the following command in the terminal in parallel with yarn dev:
npx tailwindcss -i ./assets/tailwind/input.css -o ./assets/tailwind/output.css --watch
Add Firebase Auth
Next, we will set up Firebase Auth within our project. Before proceeding, make sure that you have a Firebase account and have created a project in the Firebase console.
yarn add firebase
Create an .env file in the root of the project with the following variables. You will need to create a project in Firebase and go to project settings to obtain the necessary values.
VITE_API_KEY={firebase api key}
VITE_AUTH_DOMAIN={firebase auth domain}
VITE_PROJECT_ID={firebase project id}
VITE_STORAGE_BUCKET={firebase storage bucket}
VITE_MESSAGING_SENDER_ID={firebase messaging sender id}
VITE_APP_ID={firebase app id}
Next, create a firebase.config.ts file where you'll add the logic for Firebase authentication.
import { initializeApp, FirebaseApp } from "firebase/app";
import { getAuth } from "firebase/auth";

export default class FirebaseConfig {
    private firebaseConfig = {
        apiKey: "",
        authDomain: "",
        projectId: "",
        storageBucket: "",
        messagingSenderId: "",
        appId: "",
    };

    private app: FirebaseApp;

    constructor() {
        this.firebaseConfig = {
            apiKey: import.meta.env.VITE_API_KEY,
            authDomain: import.meta.env.VITE_AUTH_DOMAIN,
            projectId: import.meta.env.VITE_PROJECT_ID,
            storageBucket: import.meta.env.VITE_STORAGE_BUCKET,
            messagingSenderId: import.meta.env.VITE_MESSAGING_SENDER_ID,
            appId: import.meta.env.VITE_APP_ID,
        };
        this.app = initializeApp(this.firebaseConfig);
    }

    auth() {
        return getAuth(this.app);
    }
}
We will initialise our Firebase setup in the main.ts file.
import FirebaseConfig from "./firebase.config";

const firebase = new FirebaseConfig();
const auth = firebase.auth();
Implement the sign-in logic
In the index.html file, inside the <body> HTML tag, create a <div> with the class attribute set to id="app".
<div id="app"></div>
This class is responsible for rendering the components that we define below.
We will create a directory called /components inside the /src folder. Within this directory, we will define the following components:
sign-in-form.ts
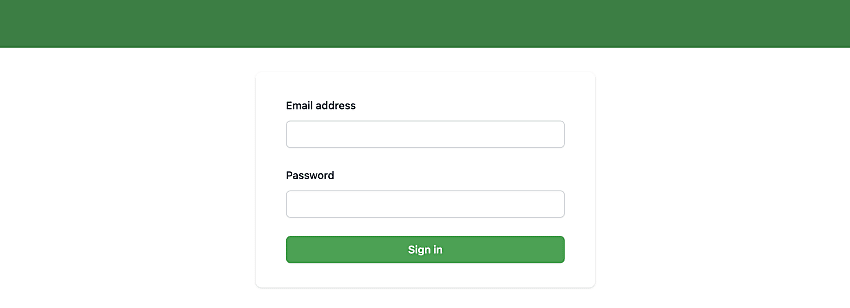
export default function componentSignIn() { return /*html*/ `
<div class="mt-8 sm:mx-auto sm:w-full sm:max-w-md">
    <div class="bg-white py-8 px-4 shadow sm:rounded-lg sm:px-10">
        <form class="space-y-6" id="sign-in-form">
            <div>
                <label for="email" class="block text-sm font-medium leading-6 text-gray-900">Email address</label>
                <div class="mt-2">
                    <input
                        id="email"
                        name="email"
                        type="email"
                        autocomplete="email"
                        required
                        class="px-2 block w-full rounded-md border-0 py-1.5 text-gray-900 shadow-sm ring-1 ring-inset ring-gray-300 placeholder:text-gray-400 focus:ring-2 focus:ring-inset focus:ring-green-600 sm:text-sm sm:leading-6"
                    />
                </div>
            </div>

            <div>
                <label for="password" class="block text-sm font-medium leading-6 text-gray-900">Password</label>
                <div class="mt-2">
                    <input
                        id="password"
                        name="password"
                        type="password"
                        autocomplete="current-password"
                        required
                        class="px-2 block w-full rounded-md border-0 py-1.5 text-gray-900 shadow-sm ring-1 ring-inset ring-gray-300 placeholder:text-gray-400 focus:ring-2 focus:ring-inset focus:ring-green-600 sm:text-sm sm:leading-6"
                    />
                </div>
            </div>

            <div>
                <button
                    type="submit"
                    class="flex w-full justify-center rounded-md bg-green-600 py-2 px-3 text-sm font-semibold text-white shadow-sm hover:bg-green-500 focus-visible:outline focus-visible:outline-2 focus-visible:outline-offset-2 focus-visible:outline-green-600"
                >
                    Sign in
                </button>
            </div>
        </form>
    </div>
</div>
`; }
signed-in.ts
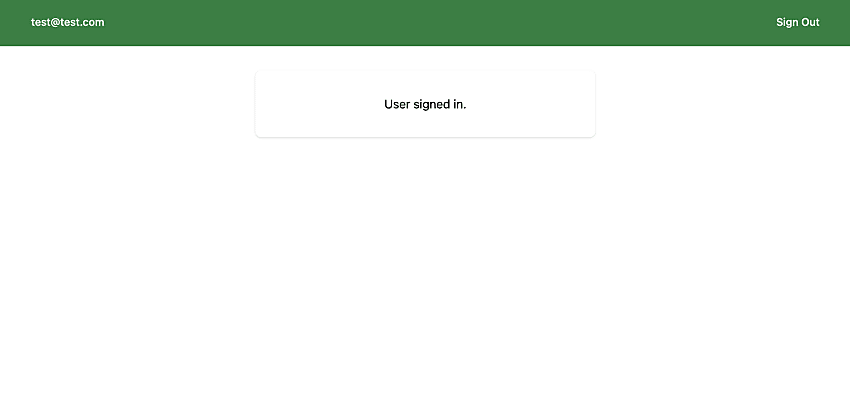
export default function componentSignedIn() { return /*html*/ `
<div class="mt-8 sm:mx-auto sm:w-full sm:max-w-md">
    <div class="bg-white py-8 px-4 shadow sm:rounded-lg sm:px-10 text-center">User signed in.</div>
</div>
`; }
To properly highlight HTML in template literals in JavaScript, you can use the
es6-string-htmlVSCode extension (link).
In addition, we need to define two utility classes that will be inside the /src/utils/index.ts file. The first utility function will be a type predicate that determines if an error is a Firebase Error. The second utility function will parse the Firebase error into a human-readable string. You can find the implementation of these utility functions in the GitHub repo, which we will link below.
Next, we will define the logic inside the main.ts file:
import FirebaseConfig from "./firebase.config";
import { onAuthStateChanged, User } from "firebase/auth";
import { parseFirebaseError, isFirebaseError } from "./utils";
import { signInWithEmailAndPassword, signOut } from "firebase/auth";
import componentSignIn from "./components/sign-in-from";
import componentSignedIn from "./components/signed-in";

const firebase = new FirebaseConfig();
const auth = firebase.auth();

const app = document.getElementById("app") as HTMLIFrameElement;

function setSignInComponent() {
    app.innerHTML = componentSignIn();
}

function setSignedInComponent() {
    app.innerHTML = componentSignedIn();
}

function setSignInSubmitListener(signInForm: HTMLFormElement) {
    signInForm.addEventListener("submit", (e) => {
        e.preventDefault();
        const email = signInForm["email"].value;
        const password = signInForm["password"].value;
        signUserIn(email, password);
    });
}

function removeSignInSubmitListener(signInForm: HTMLFormElement) {
    signInForm?.removeEventListener("submit", () => {});
}

let signedInUser: User | null = null;

window.onmessage = function (event) {
    if (event.origin === "https://localhost:3001" || event.origin === "https://localhost:3002") {
        if (event.data === "signOut") {
            signUserOut();
        }
        if (event.data === "getUserInfo") {
            sendUserInfo();
        }
    }
};

function sendUserInfo() {
    window.parent.postMessage(JSON.parse(JSON.stringify(signedInUser)), "https://localhost:3001");
    window.parent.postMessage(JSON.parse(JSON.stringify(signedInUser)), "https://localhost:3002");
}

onAuthStateChanged(auth, (user) => {
    if (user) {
        signedInUser = user;
        removeSignInSubmitListener(document.getElementById("sign-in-form") as HTMLFormElement);
        setSignedInComponent();
        sendUserInfo();
    } else {
        setSignInComponent();
        setSignInSubmitListener(document.getElementById("sign-in-form") as HTMLFormElement);
        sendUserInfo();
    }
});

async function signUserIn(email: string, password: string) {
    try {
        await signInWithEmailAndPassword(auth, email, password);
    } catch (error) {
        if (isFirebaseError(error)) {
            const readableError = parseFirebaseError(error.message);
            console.error(readableError);
        } else {
            console.error(error);
        }
    }
}

async function signUserOut() {
    signedInUser = null;
    try {
        await signOut(auth);
    } catch (error) {
        if (isFirebaseError(error)) {
            const readableError = parseFirebaseError(error.message);
            console.error(readableError);
        } else {
            console.error(error);
        }
    }
}
As shown in the code above, we have defined the window.onmessage event. This event listens for messages that will be executed from the iFrames we are going to define in the next section. We listen for two events: signOut and getUserInfo, and we execute the relevant functions. For example, when the iFrame sends a signOut event, we will log the user out. Similarly, when we receive a getUserInfo event, we will send the current user's details to the iFrame. We will learn more about these two events when we start implementing the logic in the iFrames in the next section.
window.onmessage = function (event) {
    if (event.origin === "https://localhost:3001" || event.origin === "https://localhost:3002") {
        if (event.data === "signOut") {
            signUserOut();
        }
        if (event.data === "getUserInfo") {
            sendUserInfo();
        }
    }
};
We also send user details when the authentication state changes, for example, when a user successfully signs in or signs out.
onAuthStateChanged(auth, (user) => {
    if (user) {
                ...
        sendUserInfo();
    } else {
                ...
        sendUserInfo();
    }
});
It's important to note that we use JSON.parse(JSON.stringify(signedInUser)). If we were to send the plain object without deep cloning it, we would get the following error:
It turns out the object I passed had methods, which is why the error message said An object could not be cloned.
This is because the Firebase user object we passed had methods, which is why the error message said "An object could not be cloned".
To fix this, we simply wrap our user object with JSON.parse(JSON.stringify()).
function sendUserInfo() {
    window.parent.postMessage(JSON.parse(JSON.stringify(signedInUser)), "https://localhost:3001");
    window.parent.postMessage(JSON.parse(JSON.stringify(signedInUser)), "https://localhost:3002");
}
Create a project to embed the authentication logic
As we did previously, we need to create a new Vite app called iFrame-1 that will be hosted on http://localhost:3001. The process is the same as before, and instructions are provided above. However, we do not need to install the Firebase dependency this time because all communication with Firebase will be done between the iFrame.
The difference this time is that we will set up two div elements in the index.html file: navigation, where we will load the navigation component, and sign-in-iframe, where we will load the sign-in iframe that we created in the previous section.
<!doctype html>
<html lang="en">
    <head>
        <meta charset="UTF-8" />
        <link rel="icon" type="image/svg+xml" href="/vite.svg" />
        <meta name="viewport" content="width=device-width, initial-scale=1.0" />
        <title>iFrame - 1</title>
        <link href="./assets/tailwind/output.css" rel="stylesheet" />
    </head>
    <body>
        <div id="navigation"></div>
        <div id="sign-in-iframe"></div>
        <script type="module" src="/src/main.ts"></script>
    </body>
</html>
To create the navigation component, start by creating a /components dictionary inside the /src folder. Then, create a navigation.ts file inside the /components dictionary.
export default function componentNavigation(userEmail = "", showSignIn = true) { return /*html*/ `
<nav class="bg-green-700">
    <div class="mx-auto max-w-7xl px-2 sm:px-6 lg:px-8">
        <div class="flex justify-between h-16 items-center">
            <div class="text-white rounded-md px-3 py-2 text-sm font-medium">${userEmail}</div>
            ${ showSignIn ? /*html*/ `<button
                id="sign-out-button"
                class=" text-white hover:bg-green-500 hover:text-white rounded-md px-3 py-2 text-sm font-medium"
            >
                Sign Out</button
            >` : "" }
        </div>
    </div>
</nav>
`; }
In the navigation component, we will display the user's email address and a Sign Out button if the currently authenticated user is logged in. If the user is not authenticated, we will not display anything and the navigation will be empty. Please refer to the images below.
Now, in the main.ts file, we are going to add the following code:
import componentNavigation from "./components/navigation";

window.onmessage = function (e) {
    setUserInfo(e.data);
};

const navigation = document.querySelector("#navigation") as HTMLDivElement;
const signInIframe = document.querySelector("#sign-in-iframe") as HTMLIFrameElement;

setNavigationComponent();
setSignInIframe();

function setUserInfo(userInfo: any) {
    setNavigationComponent(userInfo);
}

function setNavigationComponent(userInfo: any = null) {
    navigation.innerHTML = componentNavigation(userInfo?.email, userInfo === null ? false : true);
    if (userInfo !== null) {
        const signOutButton = document.querySelector("#sign-out-button") as HTMLButtonElement;
        signOutButton.addEventListener("click", signOut);
    }
}

function setSignInIframe() {
    signInIframe.innerHTML = /*html*/ `<iframe id="sign-in-form" src="https://localhost:3000" class="w-[100vw] h-[600px]"></iframe>`;
}

function signOut() {
    const iFrame = document.querySelector("#sign-in-form") as HTMLIFrameElement;
    if (iFrame.contentWindow) {
        iFrame.contentWindow.postMessage("signOut", "https://localhost:3000");
    }
}
From the code in the main.ts file above, we can see that we listen for events from the iframe by adding the window.onmessage function. When we receive user info, we re-render the navigation component.
window.onmessage = function (e) {
    setUserInfo(e.data);
};
To handle sign out, we send a postMessage to the iFrame. In the previous section, we created a sign out method to handle this type of situation.
function signOut() {
    const iFrame = document.querySelector("#sign-in-form") as HTMLIFrameElement;
    if (iFrame.contentWindow) {
        iFrame.contentWindow.postMessage("signOut", "https://localhost:3000");
    }
}
We have now completed the implementation inside the iFrame. The next step is to implement another identical iFrame Vite project that will run on https://localhost:3002. Since we have already covered this step, we will not repeat it in this section. Please create the project yourself.
Now, if you run all three projects at the same time (Authentication, iFrame 1, and iFrame 2), you will see that authentication works seamlessly between all the projects. This marks the end of this blog article. We hope you found it useful. You can find the GitHub repository of the project at the following link.
Conclusion
Firebase Authentication is a widely used authentication service for web applications. However, Firebase has a limitation that prevents users from remaining signed in once they have signed in across multiple domains. In this blog article, we will discuss how to work around this limitation and enable Single Sign-On (SSO) with Firebase Authentication across multiple domains.
To enable SSO with Firebase Authentication across multiple domains, we created an authentication project where we implemented all the logic to handle authentication. We then embedded the authentication project in two other applications hosted on different domains using an iframe. To communicate between the authentication project and the other two projects, we used the postMessage API.
By the end of the blog article, we were able to seamlessly authenticate users across all domains, enabling them to sign in once and remain signed in across all applications.
Further Reading
Explore more articles that might interest you.