

Building an AI Search Engine with Next.js and Free Open-Source LLMs
5th April 2025 • 12 min read — by Aleksandar Trpkovski
Play audio summary
Following my article on Create a Recommendation Engine with AI for Free, I'd like to show you how to build an intelligent search engine.
We'll create an AI search engine using Next.js as our foundation and harness the power of free, open-source LLMs, without relying on expensive APIs or proprietary models.
Here are the key technologies we'll use:
- SQLite and vector databases for efficient search indexing
- Open-source models from Hugging Face with Transformer.js for AI-powered search
By the end of this article, you'll learn how to combine Retrieval-Augmented Generation (RAG) with local free open-source models to create a powerful, privacy-friendly, and cost-effective search engine.
First, let's explore the benefits of AI-powered search and understand how RAG enhances our solution.
Why Build an AI-Powered Search Engine?
Traditional search engines rely on keyword matching, often producing irrelevant or incomplete results. In contrast, AI-powered search engines use LLMs and vector search to understand the meaning behind queries rather than simply matching words. This makes searches more intuitive, context-aware, and accurate.
Why AI Search Needs More Than Just LLMs
While AI-powered search engines excel at information retrieval, they face a significant limitation—most LLMs rely only on their pre-trained data. This means they can't access real-time or external knowledge, which is essential for accurate and up-to-date search results.
Enter RAG. Instead of depending solely on an LLM's internal knowledge, RAG retrieves relevant data from external sources before generating responses. Let's explore how this works.
What is Retrieval-Augmented Generation (RAG)?
Standard LLMs are constrained by their training data and lack real-time knowledge. RAG overcomes this limitation by retrieving relevant information from external sources to generate accurate responses.
This approach delivers up-to-date information, enables smaller models to perform better through external knowledge, and improves accuracy with fact-based responses.
RAG combines two essential components:
- Retrieval: Searching a database for relevant information based on a user query.
- Generation: Using an LLM to generate a response based on the retrieved information.
This method shines when building AI systems that need accurate, context-aware answers. Rather than relying solely on the LLM's knowledge, RAG pulls up-to-date and domain-specific information from a database, ensuring responses are both relevant and accurate.
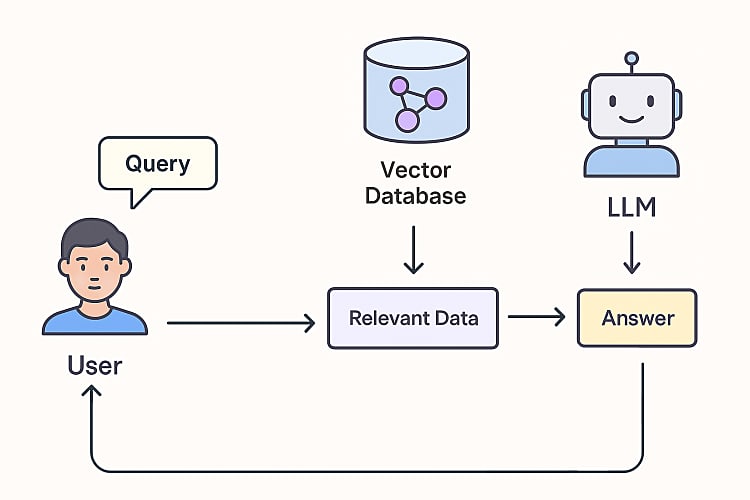
The RAG Flow Process
Now that we understand RAG's capabilities, let's examine how everything fits together in our AI search engine.
Here's the search process: When users submit questions, the system converts them into queries for the embedding model. This model transforms text into numerical vectors (embeddings) that capture semantic meaning. These embeddings search the vector database, finding similar content through cosine similarity calculations. The system then passes relevant data to an LLM, which generates contextually appropriate answers based on the retrieved information. Finally, it presents these answers to users, completing the search cycle.
Embeddings are crucial for AI search functionality. They transform text into numerical vectors that capture meaning. For instance, the sentence "AI is amazing" might become a vector like [0.1, 0.5, -0.3, ...]. This numerical representation helps measure semantic similarity between texts.
For more about embeddings and search techniques, see my article Create a Recommendation Engine with AI for Free. Since that's beyond our current scope, I'll leave those details for your further reading.
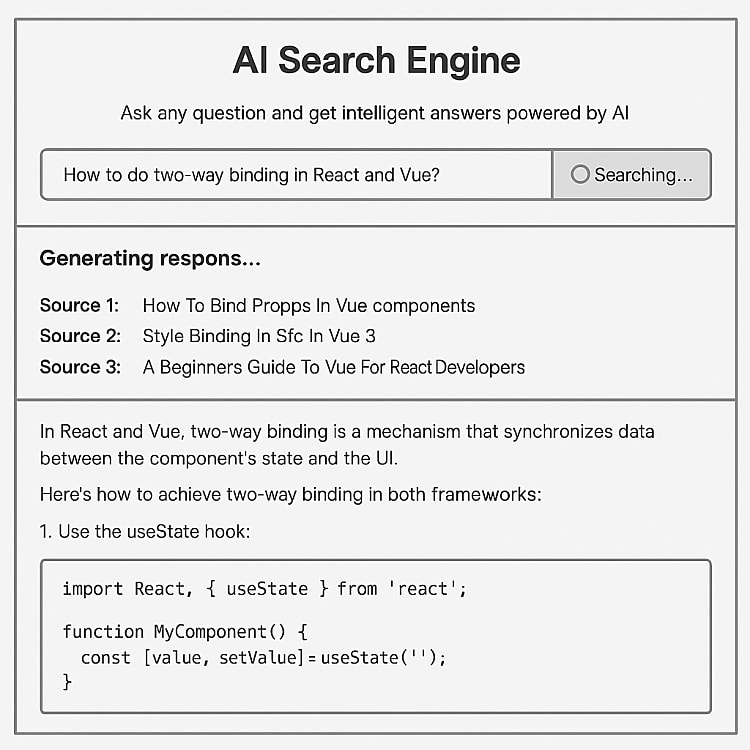
The AI Search Engine in Action
Before we start building, let me show you our target product. Here's a wireframe of the interface:
The wireframe shows a simple input field for user questions. When users press enter or click search, the AI responds with a generated answer and links to relevant documents.
To demonstrate the AI search capabilities, I'll use articles from my personal blog. We'll import these into an SQLite database to enable RAG functionality—more details coming up.
Project Setup
Start by creating a Next.js app:
npx create-next-app@latest my-nextjs-app
For detailed setup instructions, check the docs here.
Setting Up Local Open-Source Models
Create a local_models directory in your project root to store downloaded models.
Download these two essential models from Hugging Face:
- all-MiniLM-L6-v2: A lightweight model for generating embeddings.
- Phi-3-mini-4k-instruct: A compact but powerful model for text generation from Microsoft.
Use these commands to download the models:
# Download all-MiniLM-L6-v2
git clone https://huggingface.co/Xenova/all-MiniLM-L6-v2

# Download Phi-3-mini-4k-instruct
git clone https://huggingface.co/Xenova/Phi-3-mini-4k-instruct
While these models are lightweight compared to larger alternatives, they still occupy hundreds of megabytes. Download times depend on your internet speed. Since the repositories contain large files, first install Git Large File Storage (git-lfs) from https://git-lfs.com:
git lfs install
Setting Up SQLite and the Vector Database
Why SQLite?
SQLite is a lightweight, file-based database perfect for small to medium-sized projects. We'll use it to store blog articles and their vector embeddings, enabling semantic searches that find articles based on meaning rather than just keywords.
While alternatives exist—like PostgreSQL or paid services such as Supabase or Pinecone—these either require costly server resources or are paid services. This made SQLite our ideal choice.
Why Do We Need a Vector Extension?
Semantic searches require storing and querying vector embeddings. Since SQLite doesn't natively support vector operations, we'll use a platform-specific extension called sqlite-vec. This enables SQLite to handle vector data and perform similarity searches.
Installing SQLite and the Vector Extension
First, install the SQLite dependency for Node.js:
npm install better-sqlite3
Next, install the vector extension.
The
sqlite-vecpackage comes in different versions for various architectures. For Mac ARM, we'll usesqlite-vec-darwin-arm64. Other options include:sqlite-vec-darwin-x64,sqlite-vec-linux-arm64,sqlite-vec-linux-x64, andsqlite-vec-windows-x64.
To simplify cross-platform support, here's a helper function that loads the appropriate vector extension based on your system:
function getPlatformSpecificExtension() {
    const platform = process.platform;
    const arch = process.arch;

    if (platform === "darwin" && arch === "arm64") {
        return {
            packageName: "sqlite-vec-darwin-arm64",
            extension: "vec0.dylib",
        };
    }

    // For Intel Macs
    if (platform === "darwin") {
        return {
            packageName: "sqlite-vec-darwin-x64",
            extension: "vec0.dylib",
        };
    }

    if (platform === "linux" && arch === "arm64") {
        return {
            packageName: "sqlite-vec-linux-arm64",
            extension: "vec0.so",
        };
    }

    // For Intel Linux
    if (platform === "linux") {
        return {
            packageName: "sqlite-vec-linux-x64",
            extension: "vec0.so",
        };
    }

    return {
        packageName: "sqlite-vec-windows-x64",
        extension: "vec0.dll",
    };
}
This ensures the correct extension loads for your system, enabling vector operations in SQLite.
Create Database and Import Articles into the SQLite Database
To power our AI search engine, we need a database that stores articles and their embeddings. We'll create a SQLite database in the project root and populate it with data from articles-embeddings.json, which contains our blog articles and their embeddings—generated using Hugging Face's all-MiniLM-L6-v2 model through transformers.js.
The Script to Create the Database
Here's the script that creates the database, defines a virtual table for storing articles and embeddings, and imports data from articles-embeddings.json:
import * as sqliteVec from "sqlite-vec";
import DatabaseSync from "better-sqlite3";
import fs from "fs";
import path from "path";

interface Article {
    id?: number;
    articlePath: string;
    embeddings: number[];
    content: string;
}

const dbFilePath = "blog_articles.sqlite3";

export function createDatabase() {
    const articlesEmbeddings = JSON.parse(fs.readFileSync(path.resolve("./articles-embeddings.json"), "utf-8"));

    // Ensure the database file doesn't exist before creating a new one
    if (fs.existsSync(dbFilePath)) {
        fs.unlinkSync(dbFilePath); // Delete the existing file
    }

    const db = new DatabaseSync(dbFilePath, { allowExtension: true });
    sqliteVec.load(db);

    const items = articlesEmbeddings.map((article: Article, index: number) => {
        const blobData = new Uint8Array(new Float32Array(article.embeddings as number[]).buffer);
        return {
            id: index + 1,
            embeddings: blobData,
            content: article.content,
            articlePath: article.articlePath,
        };
    }) as Article[];

    const vectorDimension = articlesEmbeddings.length > 0 ? articlesEmbeddings[0].embeddings.length : 384;

    // Create the virtual table with proper vector syntax
    db.exec(`CREATE VIRTUAL TABLE blog_articles USING vec0(
        content TEXT,
        articlePath TEXT,
        embedding float[${vectorDimension}]
    )`);

    // Insert the items into the database
    for (const item of items) {
        const itemId = Number.isInteger(item.id) ? item.id : Math.floor(Number(item.id));

        // Escape single quotes in content to prevent SQL injection
        const safeContent = item.content.replace(/'/g, "''");
        const safeArticlePath = item.articlePath.replace(/'/g, "''");

        db.exec(
            `INSERT INTO blog_articles(rowid, content, articlePath, embedding)
             VALUES (${itemId}, '${safeContent}', '${safeArticlePath}', x'${Buffer.from(item.embeddings).toString(
                 "hex"
             )}')`
        );
    }

    db.close();
}

createDatabase();
For a simpler development workflow, you can use the tsx package to run TypeScript files directly instead of compiling to JavaScript first.
Install tsx as a development dependency:
npm install tsx --save-dev
Then run your createDatabase.ts script:
npx tsx createDatabase.ts
This command generates a blog_articles.sqlite3 file in your project's root directory. The resulting SQLite database—complete with your articles and their embeddings—is now ready to power your AI search engine.
Retrieving Relevant Data from the Database Using User Queries
We use Hugging Face's transformers.js library with our local all-MiniLM-L6-v2 model to generate embeddings.
First, install the transformers package:
npm install @huggingface/transformers
Here's how it works in our project:
Load a local model for embedding generation from a user query:
const embeddingsGenerator = await pipeline("feature-extraction", "./local_models/all-MiniLM-L6-v2/", {
    local_files_only: true,
});
Generate embeddings for a query:
const embeddingsOutput = await embeddingsGenerator(query, { pooling: "mean", normalize: true });
const vector = embeddingsOutput.tolist();
Use these embeddings to perform a semantic search in the SQLite database:
const rows = db
    .prepare(
        `
    SELECT rowid, distance, content, articlePath
    FROM blog_articles
    WHERE embedding MATCH ?
    ORDER BY distance
    LIMIT 3
`
    )
    .all(new Uint8Array(new Float32Array(vector[0]).buffer));
This process retrieves the three most relevant articles based on the query.
Generate a Response
For generating responses, we use our other local model, Phi-3-mini-4k-instruct. First, we load the model:
const textGenerator = await pipeline("text-generation", "./local_models/Phi-3-mini-4k-instruct/", {
    local_files_only: true,
});
We prepare a prompt that guides the text generation model. The system message includes:
- Context: The AI's role and knowledge base
- Relevant Articles: Top three search results with sources
- Instructions: Guidelines for generating responses, including:
a. Using only retrieved content
b. Avoiding unsupported claims
c. Following formatting requirements
The model receives this prompt through a messages array containing the system message and user query, generating an appropriate response with controlled length and creativity parameters.
const systemMessage = `You are an AI assistant helping users by generating accurate and well-structured responses based on retrieved knowledge.
Below are the top three most relevant content pieces retrieved from an AI-powered search engine using semantic embeddings.
Use them as context to generate a clear, concise, and helpful response to the user's query.

Here are the top three most relevant content pieces retrieved from the AI-powered search engine:

${results
    .map((article, index: number) => {
        return `${index + 1}. ${article.content}

        Source: ${"https://www.trpkovsi.com" + article.articlePath}`;
    })
    .join("\n")}

Based on the user query, generate a response using the retrieved content.

Instructions:
- Only use information that is explicitly mentioned in the retrieved content above.
- Summarise and synthesise the retrieved content to generate a helpful answer.
- Maintain a technical and informative tone.
- Do NOT make up any facts or information that isn't in the retrieved content.
- If the retrieved content doesn't contain information relevant to the query, respond with "I don't have information about that topic in my knowledge base" - don't try to provide a general response.
- If the retrieved content only partially addresses the query, only answer what's supported by the content and acknowledge the limitations.
- Use Australian English spelling and grammar.
- Ensure the response is in Markdown format.
- Cite sources inline where applicable using Markdown links to the provided URLs.
- Do not add a separate "Sources" section; instead, reference them within the relevant parts of the response.`;

const messages = [
    {
        role: "system",
        content: systemMessage,
    },
    { role: "user", content: `User query: "${query}"` },
];

const response = await textGenerator(messages, {
    max_new_tokens: 4096,
    temperature: 0.2,
});
This allows the model to generate responses that are both accurate and context-aware.
Putting It All Together
Now that we have our core functionality defined, let's assemble everything.
We need a UI for users to enter search queries and a backend API that streams responses as discussed above.
Backend API Logic
Let's start with the backend API. Next.js provides built-in API support—we just need to create an /api directory inside the existing /app directory, then create /search/route.ts.
To implement streaming responses, we'll define the stream in the response as follows:
In /api/search/route.ts, we'll modify our previous textGenerator() function to handle streaming:
const textGenerator = await pipeline("text-generation", "./local_models/Phi-3-mini-4k-instruct/", {
    local_files_only: true,
});

// ... Existing Code

// Set up streaming response
const encoder = new TextEncoder();
const stream = new TransformStream();
const writer = stream.writable.getWriter();

// Create streamer with callback function to stream chunks as they're generated
const streamer = new TextStreamer(textGenerator.tokenizer, {
    skip_prompt: true,
    callback_function: async (text) => {
        // Send the text chunk to the client
        await writer.write(encoder.encode(`data: ${JSON.stringify({ text })}\n\n`));
    },
});

// Start the generation process without awaiting its completion
textGenerator(messages, {
    max_new_tokens: 4096,
    temperature: 0.2,
    streamer,
})
    .then(async () => {
        // When generation is complete, close the stream
        await writer.write(encoder.encode("data: [DONE]\n\n"));
        await writer.close();
    })
    .catch(async (error) => {
        // Handle errors during generation
        console.error("Generation error:", error);
        await writer.write(encoder.encode(`data: ${JSON.stringify({ error: "Generation failed" })}\n\n`));
        await writer.close();
    });

// Return a streaming response
return new Response(stream.readable, {
    headers: {
        "Content-Type": "text/event-stream",
        "Cache-Control": "no-cache, no-transform",
        Connection: "keep-alive",
    },
});
We initialize the text generation pipeline and create a TransformStream to handle streaming data. A TextStreamer with a callback function streams generated text chunks to the client in real-time using a TextEncoder. The text generation process runs asynchronously, sending each chunk to the client as data: { text }. When generation completes, a [DONE] marker is sent and the stream closes. The response returns as text/event-stream, enabling real-time data reception.
Frontend Logic
For our AI search engine's frontend, we'll create a UI that handles real-time streaming of search results for a smooth user experience.
We'll implement this in src/app/page.tsx, setting up the frontend logic with React state management and event source handling.
const [result, setResult] = useState("");
const [loading, setLoading] = useState(false);
const [error, setError] = useState("");
const [rawResults, setRawResults] = useState<Array<{ content: string; articlePath: string }>>([]);

try {
    const eventSource = new EventSource(`/api/search?query=${encodeURIComponent(query)}`);

    eventSource.onmessage = (event) => {
        if (event.data === "[DONE]") {
            eventSource.close();
            setLoading(false);
            return;
        }

        try {
            const data = JSON.parse(event.data);
            if (data.error) {
                setError(data.error);
                setLoading(false);
                eventSource.close();
            } else {
                setResult((prev) => prev + (data.text || ""));
        } catch (err) {
            console.error("Error parsing event data:", err);
        }
    };

    eventSource.onerror = () => {
        setError("An error occurred while fetching results. Please try again.");
        setLoading(false);
        eventSource.close();
    };
} catch (err) {
    console.error("Error connecting to search service:", err);
    setError("Failed to connect to search service.");
    setLoading(false);
}
In this code, we establish a real-time connection to the /api/search endpoint using EventSource for server-sent events (SSE). The onmessage handler processes incoming data chunks. When it receives the [DONE] marker, it closes the connection and stops loading. Otherwise, it appends new text to the result state, updating the UI in real-time. This creates a responsive experience where search results appear as they're generated.
Frontend UI
We need a polished UI to display results. We've chosen Tailwind CSS and Markdown rendering for this purpose. The complete project is available on GitHub. Since we've covered the core AI search functionality in detail, here's a streamlined list of our UI components:
- Search Input: A text input field for user queries.
<input
    type="text"
    value={query}
    onChange={(e) => setQuery(e.target.value)}
    onKeyDown={(e) => e.key === "Enter" && !loading && query.trim() && handleSearch()}
    placeholder="What would you like to know?"
    className="flex-1 min-w-0 block w-full px-5 py-4 text-base border-0 focus:outline-none focus:ring-0"
/>
- Search Button: A button with loading indicator for the search process.
<button
    onClick={handleSearch}
    disabled={loading || !query.trim()}
    className={`cursor-pointer px-6 py-4 border-0 text-base font-medium text-white ${
        loading || !query.trim()
            ? "bg-indigo-300 cursor-not-allowed"
            : "bg-indigo-600 hover:bg-indigo-700 transition-colors duration-150"
    }`}
>
    {loading ? (
        <div className="flex items-center">
            <svg
                className="animate-spin -ml-1 mr-2 h-5 w-5 text-white"
                xmlns="http://www.w3.org/2000/svg"
                fill="none"
                viewBox="0 0 24 24"
            >
                <circle className="opacity-25" cx="12" cy="12" r="10" stroke="currentColor" strokeWidth="4"></circle>
                <path
                    className="opacity-75"
                    fill="currentColor"
                    d="M4 12a8 8 0 018-8V0C5.373 0 0 5.373 0 12h4zm2 5.291A7.962 7.962 0 014 12H0c0 3.042 1.135 5.824 3 7.938l3-2.647z"
                ></path>
            </svg>
            Searching...
        </div>
    ) : (
        "Search"
    )}
</button>
- Error Handling: A component for displaying search error messages.
{
    error && <div className="mt-4 bg-red-50 border border-red-200 text-red-700 px-4 py-3 rounded-md">{error}</div>;
}
- Search Results: Displays the AI-generated response and retrieved source articles.
- Markdown Rendering: Uses
ReactMarkdownfor rich text formatting of AI responses.
<ReactMarkdown
    remarkPlugins={[remarkGfm]}
    rehypePlugins={[rehypeRaw, rehypeSanitize, rehypeHighlight]}
    components={{
        h1: (props) => <h1 className="text-2xl font-bold mt-6 mb-4" {...props} />,
        h2: (props) => <h2 className="text-xl font-bold mt-5 mb-3" {...props} />,
        h3: (props) => <h3 className="text-lg font-bold mt-4 mb-2" {...props} />,
        p: (props) => <p className="mb-4" {...props} />,
        ul: (props) => <ul className="list-disc pl-5 mb-4" {...props} />,
        ol: (props) => <ol className="list-decimal pl-5 mb-4" {...props} />,
        li: (props) => <li className="mb-1" {...props} />,
        a: (props) => (
            <a className="text-blue-600 hover:underline" target="_blank" rel="noopener noreferrer" {...props} />
        ),
        blockquote: (props) => <blockquote className="border-l-4 border-gray-200 pl-4 py-2 mb-4 italic" {...props} />,
        code: ({ className, children, ...props }) => {
            const isChildrenArray = Array.isArray(children);
            if (!isChildrenArray) {
                return (
                    <code className={className} {...props}>
                        {children}
                    </code>
                );
            }

            return (
                <pre className="bg-gray-100 p-4 rounded overflow-x-auto mb-4">
                    <code className={className} {...props}>
                        {children}
                    </code>
                </pre>
            );
        },
        table: (props) => <table className="min-w-full divide-y divide-gray-200 mb-4" {...props} />,
        thead: (props) => <thead className="bg-gray-50" {...props} />,
        tbody: (props) => <tbody className="divide-y divide-gray-200" {...props} />,
        tr: (props) => <tr className="hover:bg-gray-50" {...props} />,
        th: (props) => (
            <th className="px-6 py-3 text-left text-xs font-medium text-gray-500 uppercase tracking-wider" {...props} />
        ),
        td: (props) => <td className="px-6 py-4 whitespace-nowrap text-sm" {...props} />,
    }}
>
    {result}
</ReactMarkdown>
Deployment
For deployment, we'll need a server with a Node.js environment. Serverless platforms like Vercel or Netlify won't support this application because the better-sqlite3 package requires filesystem access for database storage, which isn't available in serverless environments. Also note that local model files are quite large—platforms like Vercel's free tier only support up to 100MB per static file.
Additionally, since these models run on a server, we must ensure sufficient computational resources to prevent crashes.
Further Reading
Explore more articles that might interest you.